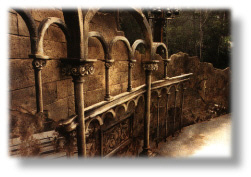
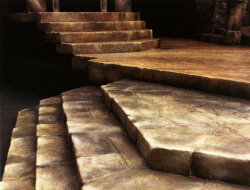
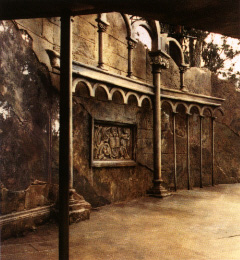
In this set for "Romeo and Juliet", the shop was faced with creating three different textures. This Technote deals with how the textures were created, glazed and finished.
In determining which textures and surfaces to use in which parts of the set, both artistic and practical issues were considered. Among the practical issues were how much traffic that part of the set would handle, whether the scenic paint would adhere to the surface and whether to carve or apply texture and how to protect these surfaces from the elements.


The Basic Textures


The photos above, show the basic materials used for most of the set.
The photos below show the finished textures.

This texture is Homosote coated with a mixture of two parts of Foamcoat and one part of FlexBond. This texture, used on the deck and steps down stage, can take the high traffic it gets in the play, accepts scenic paint very well and has a dulled sound quality.

The texture above is the white beadfoam, pitted and coated with a mixture of Foamcoat and FlexBond, but this time one part Foamcoat to two parts FlexBond. It was used as the surface for the stone walls and has a smooth stone-like quality.

The scrim-like texture is metal screening primed with Rosco Tough Prime. The areas are filled with a paste-like substance created by mixing Foamcoat with Cabisol (1:1). This surface gets no traffic, but needs to be rigid and to simulate stone.
Creating The Color Palette Through Glazing
|
Base Coat
Base Coat
(Glaze 1)
Raw Sienna |
Burnt Umber
Raw Umber
Burnt Sienna
Paynes Gray |
Glazing is a color process of layering transparent colors, one on top of another, while at the same time maintaining the integrity of each layer and or creating new richer colors in the process. Through glazing, the artist can achieve a greater sense of depth in a piece, as well as a sense of aging on a surface if desired.
On this project, several different materials in texture and color had to be brought together to achieve the desired effect in the designer’s model. In the model, the designer used a series of glazes from a limited palette to achieve the look of warm Italian stone. In order to duplicate the palette in the model, several glazes were created. Supersaturated Roscopaint colors were let down to a transparency with a mixture of Clear Flat and water, 2:1. (The more clear medium used, the more control over the movement and placement of colors.)
The glazes were mixed to the consistency and intensity that allowed the paint to be applied directly and achieve the desired look efficiently. In general, glazing works best layering from dark to light, working two to three like colors together in each step (perhaps a warm and cool from the same family of colors), only managing as many colors as you are comfortable with at one time. The photos at the left show the glazing colors used in this project. On the page at the right, you can see results as colors were added to the glaze.
Using The Glazing Technique
 |
 |
 & Raw Umber |
 Burnt Sienna |
- An opaque base coat of two colors was applied as an overall soft blend or scumble, allowing each color to stand alone and mix slightly when their edges met. Each area of color covered approximately three to four feet. When dry, it was sealed with Clear Flat and water (2:1) in a sprayer to assure that the base colors would not pick up when applying the glazes. Before the next step, it was allowed to dry thoroughly.
- Glaze 1 (colors 1 and 2): Applied with brushes overall along with some spatter and splashing to enhance the sense of texture.
- Overall glaze of Raw Sienna was brushed on to even out the general tone. When that was thoroughly dry the Burnt Umber and Raw Umber was applied by puddling over the surface with some spatter and splashing where darker toning was indicated on the original rendering. Where necessary, some puddles were sponged up with a natural sponge.
- An accent glaze of Paynes Grey and Burnt Sienna was applied only where indicated on the rendering. This step is very specific and covers less surface than the other steps.
- The deck was sealed with a low luster poly 2-3 times for protection from traffic and outdoor elements.
All colors standard in Supersaturated Roscopaint, except for Paynes Gray, which was created by mixing colors.
Creating The Steps, Deck & Back Wall

- For the steps, stone-like shapes were created out of Homosote and applied to existing step treads and risers.
- Individual stones were then shaped with a grinder to achieve a slate-like stone, smooth and angular with chipped away worn edges, leaving fairly distinct grout spacing.
- Next, everything was coated, including grout, with a Foamcoat and FlexBond mixture (two parts Foamcoat, one part FlexBond). This was repeated two or three time.
- Base coat was laid in and let dry.
- Next, the glazing, described more fully on the next pages. It is important to note here that the designer wanted the steps cooler in color than the majority of the set. To accomplish this, fewer glazes were used here and more Raw Umber and paynes grey were used for the overall tone. Then the warmer Ochre and Raw Sienna were applied as accent glazes.
- When dry, everything was sealed with poly two or three times.

- For the back wall, the flats were built and covered with beadfoam and metal screen where indicated on the designer elevations. The bead-foam was cut away to create a profile edge which merged with the metal screen.
- To simulate the pitted stone texture, a small amount of acetone was first drizzled and spattered onto the beadfoam. The painters were careful to wear gloves and a respirator during this process. Some painters prefer to achieve the pined look by picking away the foam by hand or with a rasp.
- Then a Foamcoat and FlexBond mixture (one part Foamcoat, two parts FlexBond) was applied to the foam surfaces twice—making sure to get in all of the little holes to seal the foam completely
- The screening was primed with tinted Tough Prime to allow the screen to accept the paint and texture.
- When the Tough Prime was completely dry, the Foamcoat and Cabisol mixture (1:1) was applied in a paste-like consistency so as to fill up the screen where opacity was indicated on the rendering. It was applied with a puny knife or trowel onto the screen and left to dry.
- The basecoat blend was then applied to all surfaces.
- When all textures were completely dry, the glaze process was applied.
Some Of The Products Used In This Project
FoamCoat
Foamcoat is a water-based, flame retarding protective coating for Styrofoam and polystyrene foams. It is often mixed with FlexBond, as it was for the project described in these pages. Whether diluted or used alone, Foamcoat dries to a hard durable coating that resists chipping and cracking, yet can be sanded smooth or carved with detailing. Foamcoat is often used as a texturing agent to create custom patterns like bark or stone work.
Tough Prime
A water-based primer often used for the hard-to-prime scenic materials found in every scene shop. Tough Prime adheres to just about any surface, including PVC pipe, aluminum, foams and plastics, as well as muslin, wood and foam core. This quick drying acrylic emulsion primer dries to a tough, durable coating which can be painted over with any paint and is excellent for both interior and exterior use.
Flexbond
A clear, flexible scenic glue which bonds many porous and nonporous scenic materials. FlexBond is also often mixed with Foamcoat. When used alone as a glue, it dries to a clear, hard, yet pliable coating that does not suffer from the "tackiness" common in many other flexible glues. unlike ordinary "white" glues, which crack and break when flexed, the adhesive bond of FlexBond remains extremely pliable and strong even as the material bends and deforms
Supersaturated RoscoPaint
One of Rosco’s three ranges of scenic paints, Supersaturated is specially suited to the glazing techniques described in this brochure. The range includes 23 brilliant, dye-like colors. Supersaturated with pigment, the colors are formulated to be diluted with substantial quantities of water while retaining binder strength. This paint adheres to most scenic I surfaces, including muslin, plastic and metal and dries to a completely matte, non-reflective finish.


